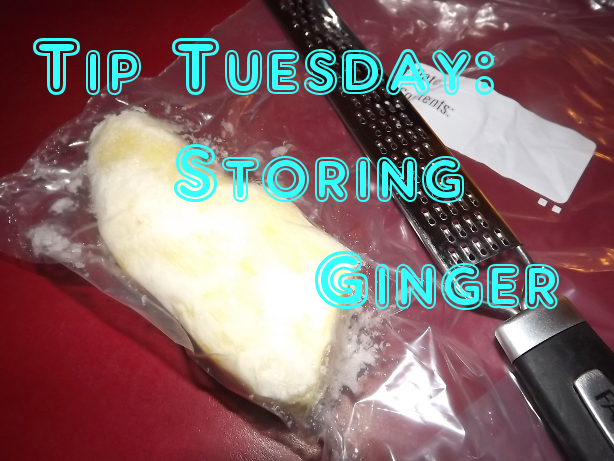
Okay guys you’re going to think I’m nutty, but this is so simple It only took me a minute to explain it in video! Do you often find yourself buying fresh ginger for an extra kick to a stir fry or maybe you tried that old fashion recipe for ginger snaps and then just had extra? Here is a great tip to save you money on ginger! Peel a large piece of ginger and put it in a zip lock bag. Then when you’re ready to make stir fry or cookies, use a fine grater to shave some off. The texture is often nicer AND you won’t waste money on molded or dried out ginger again. It works great I promise!
If you have any tips for a tip Tuesday please leave me a comment or send me an email. Thanks!
One thing I want to note, I left this recipe up because some people genuinely enjoy it, BUT this recipe is VERY high in salt. Please try out one of my other pancake recipes if you cannot eat a lot of salt. Personally I don’t use this recipe anymore because the pancakes would come out kinda salty.
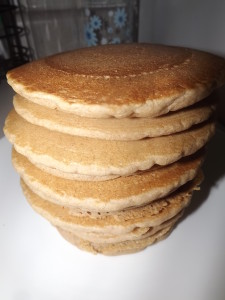
So I already have a couple pancake recipes on this website but I doubt one more would hurt! This is a slightly edited version of the recipe found in The Happy Herbivore Cookbook: Over 175 Delicious Fat-Free and Low-Fat Vegan Recipes. While the original recipe is really good I found with a few minor adjustments you can change it up and make it even better. Make sure to try it out with my Blueberry Maple Syrup recipe, it was one of the best breakfasts I'd had in along time!
Author: FaylinaMeir
Serves: 6 pancakes
Ingredients
1 cup whole wheat flour
1 cup whole wheat All Purpose flour (see variation note)
2 cups warm water
¼ cup maple syrup
1½ tablespoons baking powder pinch salt
1 tablespoon vinegar
1 teaspoon cinnamon
1 tablespoon rice flour (or extra wheat flour for thickening)
Instructions
Get your pan preheating over medium heat. You will want a good nonstick pan for this since there is no extra oils added, if you don't have that then get your best nonstick and a SMALL amount of oil spray.
In a mixing bowl, add your flours (minus rice flour), baking powder, pinch of salt, and cinnamon. Stir well to combine. In a smaller bowl (or mason jar) add your water, vinegar, and maple syrup. Stir to combine. Add the wet ingredients to the dry ingredients and mix well with a whisk. You do not want any clumps of flour mixture remaining. If your batter seems loose add 1 tablespoon of rice flour, or wheat flour, and set aside for 5-10 minutes. You don't have to let the batter set but as I was making these I noticed the 3 and 4th pancake turned out better than the beginning.
Add ¼ cup of batter to your pan at a time and cook for about 2 minutes. You know it's time to flip when the pancakes are all bubbly onto and the edges are cooked. Cook for 1-2 minutes on the second side and serve warm. These will last in the fridge for about 3-5 days if tightly wrapped but I doubt they will last that long!
Notes
VARIATIONS (as seen in photo) : the variation I made was I used ¾ cup whole wheat all-purpose flour, ¼ cup kaput flour, and 1 cup whole wheat flour. This is not required as Kamut is a variation of wheat but it has great flavor and nutrition. If you can find it make sure to store it in the freezer with your whole wheat flour for best nutrition retention. Any other gluten containing flour could be used instead of kamut, Rye for instances would be a great addition.
1 bag cranberries (12-16 ounces)
1 750ml bottle of sweet wine (*See note*)
1/2 cup dark brown sugar
pinch salt
Directions:
In a medium stock pot add your sugar. Turn your burner onto medium high. Wash your cranberries well under warm running water, shake most the water off. Add your cranberries to the pot and stir well to mix with the sugar. After about 60 seconds of stirring, lift your pot off the burner and away from the flame and slowly add some of your wine. Adding only a little at a time will help prevent boil over, when working with alcohol this is important as a boil over could produce flame (never good!). Once you get enough in the pan to coat the bottom of the pan with at-least a 1/4 inch or about a centimeter, you can return the pan to the stove and add the remaining wine. Save that wine bottle though as its a great way to serve your sauce that’ll have your guests wondering!
Bring to a boil while stirring. You want to stir your sauce mixture until all the sugar is dissolved and you no longer feel the sugar at the bottom of the pot.
Once the sauce is boiling, turn the heat down to a simmer or just a little higher. You will want to reduce your sauce down depending on how thick you want your final product. If you want something closer to a jelly or jam, reduce it down by half. If you want something more like a slightly thickened sauce, 1/3 – 1/4 will do just fine. (I reduced by 1/4) Just make a mental note where the sauce started, so you know when you get there. Let it cook uncovered until your desired thickness, make sure to stir every 2-5 minutes just in case, other than that it doesn’t require much effort.
After your sauce is your desired consistency, use an immersion blender or transfer tinto a blender continer. Blend on high until the sauce is a very fine puree, you can optionally strain the sauce if you want.
As this sauce cools down it will thicken up a good bit due to the pectin in the cranberries, so keep this in mind while making it. If kept in a tight fitting glass container this sauce will keep up to 2 – 3 weeks. (photo was taken after sauce was 2 weeks old!)
*NOTE* Make sure you ONLY use a wine you would drink plain. Cooking this wine concentrates the flavor, so if you don’t like the wine to start with, this won’t make it better. I suggest a sweet white wine like a moscato d’asti or a riesling. A sweet red like a rose wine would also go amazingly with this.
CAUTION: If you’re making this for someone who is gluten intolerant or a vegan. Please make sure that the wine you’re using is gluten free and contains no animal products. Most wines are finished with isinglass, this is a concentrated substance from the bladder of fish. Some wines are made with wheat and wheat like products. When it doubt call the producer of this wine or choose a different brand.
Have you ever wondered how they make vanilla extract, or been curious why they can taste so different from brand to brand? Well some brand actually use chemicals in the processing of their extracts, leading you ingesting poisons you would rather not have, but I have a solution for you! Just make you own like I do. Now that might sound confusing and borderline scary, but once you try this I promise you'll never buy the junky overpriced stuff in the store.
Author: FaylinaMeir
Serves: 2 cups
Ingredients
10 long sized (6-7") vanilla beans (see notes)
14-15 ounces clear and unflavored vodka
16 ounce GLASS container , amber works best
scissors
Instructions
If your beans are older you can snap them, otherwise, use your scissors and cut 10 beans into ½ inch - 1 inch pieces and put them inside a glass container that's at-least 16 ounces and has a tight fitting lid. Pour in 14 - 15 ounces of a clear unflavored vodka. I just use the cheapest vodka at the store, but if you want you can use the more expensive stuff. The important part is to not get flavored vodka or a mix vodka, this will ruin the final flavor and is a waste of good vanilla beans.
After you add the vodka, put on the cap and shake gently to help the process along. You will notice that it will already turn a slightly browner color and you might see little black specs, this is normal and is what will make your homemade extract 100 times better than store-bought in the end. Put your extract in a darker place, away from direct sunlight. An amber bottle will help with this, but since they're hard to find, storing away from sunlight works best. For the first week, try to shake it once a day, I find this helps give the best results.
Minimum time for soaking is 2 weeks, this will give a weaker flavor, but still comparable to something in the store. One month is best for a full flavored extract that is slightly stronger than double strength at the store.
At this point you can strain out the vanilla pods in a coarse mesh strainer (you want the seeds to fall through) or you can leave them in there. After about 2 months time, the extract will not get any stronger. At this stage you will have something super flavorful that makes this more than worth your while. As seen in the video it bests VERY dark and wonderful. The smell is something that cannot be described and the taste is nothing like vanilla from a bottle in the super market.
Notes
Some of you might be saying to yourself that making homemade vanilla extract would cost a small fortune, and you very well could be right. If you go to buy vanilla pods in the store they're usually 2 pods for 10 dollars USD, however, I have been using vanilla beans purchased off the Internet for years now with no issues. I purchase mine on eBay from a VERY well known and respected seller,CLICK HERE, please note that I am NOT being paid to advertise these people, I just like their products. I use grade B or extract grade vanilla, planifolia aka Madagascar bourbon beans. You can use grade a but it does not yield any better results, I have tried it. You can also use Tahitian vanilla but they do tend to be more expensive. I always suggest buying a pound of beans, this saves you a lot of money on shipping and the final product. After shipping it only costs about 31 dollars and will last you many years. Over time they dry out and are only good for extract, but I am on 3 years and the beans still produce an amazing flavored extract. Store vanilla in a tight fitting container, like a quart sized wide mouth mason jar away from direct sunlight. If your vanilla gets white mold of them , obviously throw them away or compost them.
So for this weeks SMART meal we were given the topic of tomatoes, wonderful! Tomatoes are such a versatile fruit to use in just about everything from curry, to condiments. Let’s not forget the old stand-by of pasta sauce, but my favorite way to eat tomatoes is raw. About a month ago I did a recipe on bruschetta and I knew I had to make it again because it’s just that tasty.
In total this cost me about $6.00 to make and you could easily get 6 servings, making it only $1.00 a serving.
For the original recipe go to: HERE
The only variation between this and that is I didn’t have fresh parsley this time, so instead I used some dried oregano. Would have been better with some fresh basil or parsley, but sometimes we need to make due without.