Since losing over 80 pounds I often get asked for advice on either how to lose weight or how to start a diet. I usually take the time to write out my responses, but that gets tedious after awhile. So, here is my LONG overdue 11 simple tips on starting a healthy diet / lifestyle. These things work regardless of the diet, and I have done all of them myself.
*obligatory legal notice*
Before this list I need to remind you that I am NOT a licensed medical professional, I’m just a regular person who has lived the fat person life and has done these tips to change their lifestyle. Please consult a doctor before starting, stopping, or changing your diet OR starting/stopping an exercise program. Thank you!
1. Lifestyle NOT diet
Even though I will refer to “diet” in the video and post, you shouldn’t go searching for a diet. Instead try to find a way of living you can sustain for most of your life with only few modifications. For some this could be paleo or vegan or just flexible dieting. You need to break the habits that got you to where you are today, and I assume, overweight. If you just think of it like a “diet” you’re more likely to gain the weight back later. Which leads me to my second tips..
2. Do it for YOURSELF!
Seem silly this is my #2? Well not really. I explain it to people like this. I used to smoke, and I tried to quit a lot, but it wasn’t until I wanted to do it for myself that I actually did it. Not when my husband quit, or when he asked me to or when my family bothered me about it. Heck, I didn’t even quit knowing it was the right thing (I wasn’t ignorant of what I was choosing to do to myself). Eventually I WANTED to quit smoking, and I did it cold turkey. A diet is the same way. Don’t quit just because a family member wants you to. To break those nasty habits takes self motivation, without it, you’ll probably end up just as fat or worse off.
3. Baby steps or not : whatever works for you!
You’ll often hear people tell you to take baby steps, or maybe to JUST DO IT! (Shia reference? yeah horrible I know!) Well you need to figure out what works for you. For example: if I have junk food in the house, I will eat it because it’s there. It’s best for me to just not buy junk food. I am the type of person to just go all in on whatever I do. For some people though that scares them and if you need baby steps, you do that instead. Set goals and work towards them, but limit yourself on time. If you take “baby steps” for 3 years, you aren’t really accomplishing anything, sorry to say!
4. Make realistic goals
Again, it’s so simple but important. A lot of people get frustrated they don’t lose 20 pounds like the girls in the magazines or can’t lose weight as quickly as their favorite celebrity. The fact of the matter is this, everyone is different. I also tell everyone this simple thing. Chances are you didn’t gain all your weight that quickly, so why should you expect to lose it super quickly? My goal for 2015 is to lose 20 pounds. If I go past that then fantastic, but I’m being realistic. Just because your fitness website says you CAN lose 2 pounds a week eating 1200 calories doesn’t mean you should A. eat 1200 or b. lose weight that quickly. Weight loss is NOT linear, you can look at my weekly weight loss videos and you’ll see what I mean.
5. Set mini goals & reward yourself!
The grind of losing weight can be very stressful, so instead of worrying about it set small goals. Maybe in 3 months you’d like to work up to exercising 3-4 times a week or maybe you want to learn to enjoy new vegetables / foods. Also, don’t forget to reward yourself. Maybe you lose 10-20 pounds and you go buy yourself a nice shirt, or a new pair of jeans. I did this and now my jeans don’t fit anymore and I have to wear a belt to keep them on my butt. HOWEVER I look at these jeans and I feel proud about what I’ve done and that reward is very powerful for me. Try not to reward yourself with food, that can be a bad habit to form.
6. Track your calories
A lot of new fad diets tell you not to count calories and for a lot of folks, this doesn’t work well in the end. You don’t have to be a calorie nazi, but having an idea of what you’re putting in your body is a good thing. Look into websites like myfitnesspal.com , sparkpeople, or cronometer.com. I’m not sponsered by them and have used them before. I personally am on myfitnesspal or mfp. It’s probably the easiest to use, plus there is a social aspect to it. Also, I suggest using a food scale and using GRAMS (yes sorry my American friends) to weigh out food. You’ll find over time, it’s much easier to judge the calories in food. These days I can almost do it just by eye.
7. Pre-plan meals or pre-cook foods for the week
If you find you’re often crunched for time, consider either meal planning your meals for the week OR doing large batch cooking on your days off. For example: if you want to eat quinoa, but that is something you don’t normally have time for. Cook a large batch and store in the fridge, it’ll stay good for 5-7 days depending on conditions. Also consider freezing meals for later like homemade tv dinners. You’ll also probably save money and not waste a lot of food! Extra bonuses.
8. Motivation from family and friends
Going it alone is difficult, so when possible recruit a family member or friend to do this with you. Maybe you and your spouse can go to the gym together or go for walks after dinner. Maybe you and you kids can go play outside or go swimming. You could also make friends online and get together to exercise or keep each other on track. This is a great thing and don’t be embarrassed. My husband and I inspire each other and he makes me want to work harder in the gym. We also check each other meaning if he’s gonna eat something really bad I will say “maybe you shouldn’t” and he will do the same thing to me. It doesn’t work for everyone, but it works for us.
9. Eat veggies first
This is a great tip for everyone, especially those working on trying new veggies. When I was a foster mom I would have all the children (step son included) eat the vegetables first. Over time you learn to enjoy them more, you are also ensuring you get good nutrition and the fiber helps you feel full and gives signals to your brain. This is a habit we all still have today.
10. NO NIGHT EATING!
No matter what diet you follow, unless you work overnight and have your hours flipped around, stop eating towards bedtime. I hear so many people say “It’s just a habit I have”. Well break that habit and make it important. Eating before bed effects your sleep as you then have to put effort into digesting, it can also give you acid reflux, and overall bad sleep. On top of that it can mess with insulin levels and those sleepy time hormones. It’s best to give at least 3-5 hours before bed. If you honestly can’t go that long, then try your bed. No bowl of cereal before bed, no doughnut 30 minutes before bed, and holy crap don’t wake up in the middle of the night to eat. Take a drink of cold water and go back to bed.
11. Exercise isn’t the most important?
Finally we are at the end folks with the most controversial tip on my list. Exercise doesn’t have to be the most important! Put your pitch forks down and let me explain please. At my highest I was 298 lbs, I was in pain and even walking a few blocks was a chore for me. I decided I needed to lose some weight and that was more important than “toning”, but really how much toning do you do at 298 pounds?, anyways I focused on food. I walked when my back would allow me and over time I found I naturally got better at it and my stamina allowed me to do more. Now, I’m not telling you to eat a salad and sit on your butt all day, but if that is what you need for the first few months, then so be it. People often overwhelm themselves by getting healthy. They think they need to go to the gym 3-4 times a week, quit all their bad habits, and eat “clean” (which is a whole different rant!). This isn’t the case. Focus on the food first and get used to your chosen “diet”, then let the rest fall into place.
Do you agree with me ? Do you have tips of your own? Leave me a comment and let me know. Thanks guys and I hope you enjoyed. bye-bye!
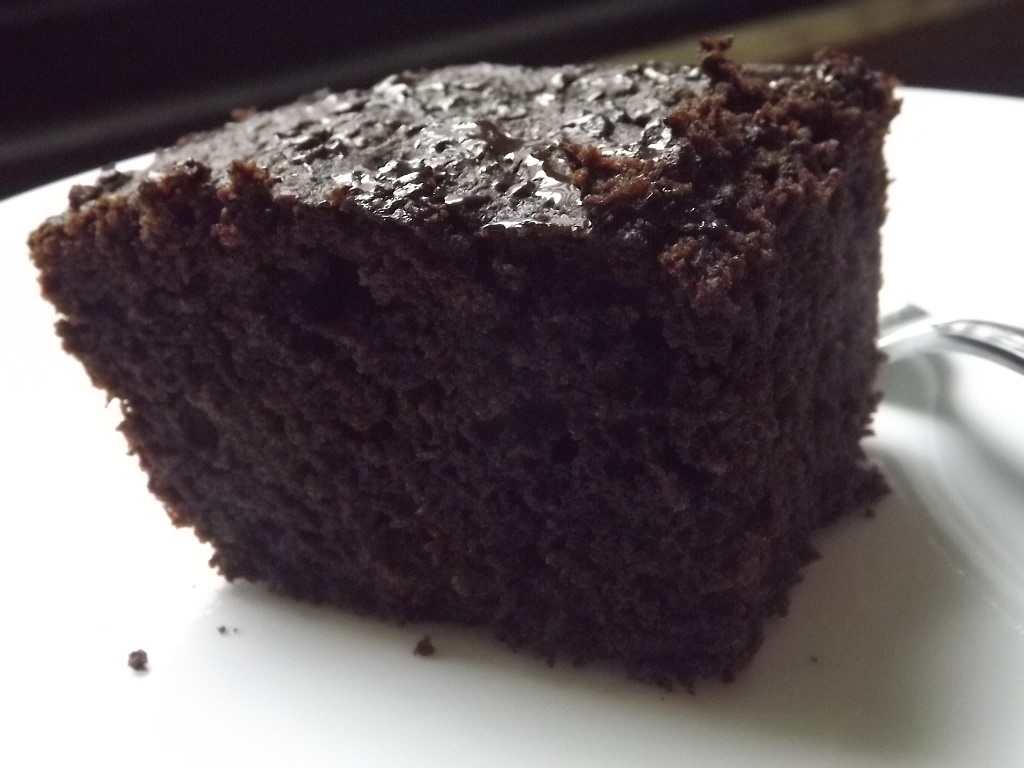
I got this craving for a brownie so I went to the kitchen and threw stuff together and it worked! That is literally how this came to be.
Author: FaylinaMeir
Serves: 6 pieces
Ingredients
½ cup Coconut Flour
¼ cup Tapioca Starch
¼ cup Toasted Carob Powder (or ¼ cup cocoa powder)
½ tsp, Baking soda
1 tsp Baking Powder Aluminum Free & Double Acting
3 eggs
¼ cup plus 2 tablespoons Coconut Milk
¼ cup Honey
1 tsp Pure Vanilla Extract
2 tsp apple cider vinegar
2 tablespoons Coconut Oil
Instructions
Preheat your oven to 350f (175c).
In a large bowl mix together your eggs and honey until well combined. Then add your apple cider vinegar, vanilla, coconut milk, and coconut oil. Don't worry if your coconut oil forms little solid pieces, this is actually what you want because when the brownie bakes it makes these yummy little pockets. Make sure you whisk this together very well, you don't want the oil chunks very large.
In another bowl, mix the rest of your ingredients together well. You don't want any lumps.
Grease your baking container well; I used a glass loaf pan. Don't use a large pan if you want these to be taller. Once your oven is well preheated, mix your dry ingredients into your wet ingredients and whisk til there are no lumps. Scrape your batter into your container and even it out.
Bake in the middle of your oven for 25-35 minutes (see notes). I like my brownies well done so I went the full 35 minutes. A toothpick inserted into the middle will come out clean. Let cool in the pan for at east 10 minutes. Serve warm, and try some butter on top, it tastes amazing!
Notes
If you want more fudgy/gooey brownies only bake it about 80% done, about 25 minutes. A toothpick will come out almost clean and might be a little jiggly in the middle. Let cool at least 20 minutes.
After I posted a photo of my homemade bread stuffed with cream cheese and candied chili peppers in a Facebook group, everyone all but demanded I show them how to do it. Of course I agreed happily, as any excuse to make this wonderful bread is welcomed in my house. I have to thank Steve Gamelin off of YouTube who has taught me so much about making bread easily. I have adapted this technique and hope to show you many recipes using the no knead overnight method. If you would like to check out his book, and I HIGHLY suggest you do because it is awesome. Here a link to amazon where it can be purchased or borrowed with amazon unlimited. My No-Knead Bread Cookbook (B&W Version): From the Kitchen of Artisan Bread with Steve.
I decided to make 4 larger sized rolls with this recipe so I used 1/2 block of cream cheese and 4 ounces of jalapenos but you can make 6, just adjust the recipe accordingly.
No Knead Bread stuffed with chili peppers & Cheese! (Pan relleno de chiles y queso!)
3 cups all purpose or bread flour (unbleached is best)
12 ounces of cool water
¼ teaspoon instant yeast
1 teaspoon salt
Fillings:
1 ounce cream cheese per piece of bread
1 ounce pickled/candied jalapenos per piece of bread
Topping: (optional)
1 whole egg
1 tablespoon water
1 tablespoon sesame seeds
Suggested Materials:
Baking stone that can go at least 450° F
Parchment paper cut to the size of your stone
Wire cooling rack
Bowl/bench scrapper
Large glass bowl
Plastic wrap
Silicone brush
Instructions
At least 8 hours before you want to make the bread, (14 is better), mix the dough ingredients in a bowl like shown in the video. A large glass bowl works best for you. Cover with plastic wrap and let set on your kitchen counter overnight. If your house is cold/drafty place into the oven and close the door. This should help keep it slightly warmer.
Once your dough as more than double in size, scrape it out onto a well floured work surface. Form it into a ball as shown in the video and divide into 4 or 6 pieces. Take one piece of dough at a time and flatten it into about the size of your hand (roughly 6in x 3in). Place your cream cheese and jalapenos on top and pinch it closed. (really watch the video, much easier than describing it)
Place onto parchment paper or baking sheet. Repeat with all pieces of dough. Cover with a flour sack towel or any lint free towel and let rise on your counter for 90 minutes. After 90 minutes get your oven preheating to 450°F and set your timer for an additional 30 minutes. In total dough should rise for 120 minutes (2 hours). If you don't have a pizza stone please see NOTES
After 2 hours, prepare your egg wash by mixing water and egg thoroughly. Use your silicone brush to thoroughly baste the tops of the dough with egg. Cut 2 or 3 slashes onto the tops with scissors and sprinkle with sesame seeds if desired.
Put into a hot oven on a pizza stone for 20-25 minutes. Bread should be nicely browned and when you tap on the bottom they sound hallow. Transfer to a wire rack and let cool for at least 20 minutes before cutting into them. If you skip the step the dough might not be cooked all the way through... and that would be sad. 🙁
Store in the fridge for 3 days at most for best results.
Notes
Bread can be frozen if desired. Cool completely. Wrap in plastic wrap and aluminum foil to prevent freezer burn. Store in a zip top bag and use within a few months.
If you do not have a pizza stone you CAN make this without, you just might not get as good of crust. Line a baking sheet with parchment paper or sprinkle down cornmeal on the bottom to prevent sticking. Let dough rise for 1 hour 45 minutes. Preheat the oven for only 15 minutes and baking directly on the tray. Remove from the tray onto rack when done cooking.
One thing I want to note, I left this recipe up because some people genuinely enjoy it, BUT this recipe is VERY high in salt. Please try out one of my other pancake recipes if you cannot eat a lot of salt. Personally I don’t use this recipe anymore because the pancakes would come out kinda salty.
So I already have a couple pancake recipes on this website but I doubt one more would hurt! This is a slightly edited version of the recipe found in The Happy Herbivore Cookbook: Over 175 Delicious Fat-Free and Low-Fat Vegan Recipes. While the original recipe is really good I found with a few minor adjustments you can change it up and make it even better. Make sure to try it out with my Blueberry Maple Syrup recipe, it was one of the best breakfasts I'd had in along time!
Author: FaylinaMeir
Serves: 6 pancakes
Ingredients
1 cup whole wheat flour
1 cup whole wheat All Purpose flour (see variation note)
2 cups warm water
¼ cup maple syrup
1½ tablespoons baking powder pinch salt
1 tablespoon vinegar
1 teaspoon cinnamon
1 tablespoon rice flour (or extra wheat flour for thickening)
Instructions
Get your pan preheating over medium heat. You will want a good nonstick pan for this since there is no extra oils added, if you don't have that then get your best nonstick and a SMALL amount of oil spray.
In a mixing bowl, add your flours (minus rice flour), baking powder, pinch of salt, and cinnamon. Stir well to combine. In a smaller bowl (or mason jar) add your water, vinegar, and maple syrup. Stir to combine. Add the wet ingredients to the dry ingredients and mix well with a whisk. You do not want any clumps of flour mixture remaining. If your batter seems loose add 1 tablespoon of rice flour, or wheat flour, and set aside for 5-10 minutes. You don't have to let the batter set but as I was making these I noticed the 3 and 4th pancake turned out better than the beginning.
Add ¼ cup of batter to your pan at a time and cook for about 2 minutes. You know it's time to flip when the pancakes are all bubbly onto and the edges are cooked. Cook for 1-2 minutes on the second side and serve warm. These will last in the fridge for about 3-5 days if tightly wrapped but I doubt they will last that long!
Notes
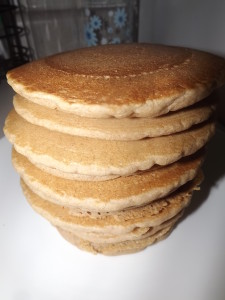
VARIATIONS (as seen in photo) : the variation I made was I used ¾ cup whole wheat all-purpose flour, ¼ cup kaput flour, and 1 cup whole wheat flour. This is not required as Kamut is a variation of wheat but it has great flavor and nutrition. If you can find it make sure to store it in the freezer with your whole wheat flour for best nutrition retention. Any other gluten containing flour could be used instead of kamut, Rye for instances would be a great addition.
1 bag cranberries (12-16 ounces)
1 750ml bottle of sweet wine (*See note*)
1/2 cup dark brown sugar
pinch salt
Directions:
In a medium stock pot add your sugar. Turn your burner onto medium high. Wash your cranberries well under warm running water, shake most the water off. Add your cranberries to the pot and stir well to mix with the sugar. After about 60 seconds of stirring, lift your pot off the burner and away from the flame and slowly add some of your wine. Adding only a little at a time will help prevent boil over, when working with alcohol this is important as a boil over could produce flame (never good!). Once you get enough in the pan to coat the bottom of the pan with at-least a 1/4 inch or about a centimeter, you can return the pan to the stove and add the remaining wine. Save that wine bottle though as its a great way to serve your sauce that’ll have your guests wondering!
Bring to a boil while stirring. You want to stir your sauce mixture until all the sugar is dissolved and you no longer feel the sugar at the bottom of the pot.
Once the sauce is boiling, turn the heat down to a simmer or just a little higher. You will want to reduce your sauce down depending on how thick you want your final product. If you want something closer to a jelly or jam, reduce it down by half. If you want something more like a slightly thickened sauce, 1/3 – 1/4 will do just fine. (I reduced by 1/4) Just make a mental note where the sauce started, so you know when you get there. Let it cook uncovered until your desired thickness, make sure to stir every 2-5 minutes just in case, other than that it doesn’t require much effort.
After your sauce is your desired consistency, use an immersion blender or transfer tinto a blender continer. Blend on high until the sauce is a very fine puree, you can optionally strain the sauce if you want.
As this sauce cools down it will thicken up a good bit due to the pectin in the cranberries, so keep this in mind while making it. If kept in a tight fitting glass container this sauce will keep up to 2 – 3 weeks. (photo was taken after sauce was 2 weeks old!)
*NOTE* Make sure you ONLY use a wine you would drink plain. Cooking this wine concentrates the flavor, so if you don’t like the wine to start with, this won’t make it better. I suggest a sweet white wine like a moscato d’asti or a riesling. A sweet red like a rose wine would also go amazingly with this.
CAUTION: If you’re making this for someone who is gluten intolerant or a vegan. Please make sure that the wine you’re using is gluten free and contains no animal products. Most wines are finished with isinglass, this is a concentrated substance from the bladder of fish. Some wines are made with wheat and wheat like products. When it doubt call the producer of this wine or choose a different brand.