2 lbs Roma tomatoes, cored and seeded
1 tablespoon olive oil or grape-seed oil
1 tablespoon Italian seasoning mix
1 1/2 tablespoons oregano
1 heavy pinch red pepper flakes (optional)
1/2 teaspoon freshly cracked black pepper
1 1/2 tablespoons minced garlic
pinch salt or to taste
optionally to thicken: 1 – 2 tablespoons ground flax seeds or half that amount in psyllium husk or ground chia seeds
Directions:
To start out you need to prep your tomatoes by coring them. The best way to do this is to use an apple corer or you can cut the tomatoes in half and use a V cut to remove the core. Then you need to scrape the seeds out using your fingers. While not required, it helps to remove extra liquid and makes the cooking time faster. (don’t throw the liquid and core out, I ate it with a little tabasco as a virgin bloody Mary shot (lol) however you can add this to a salad dressing for extra nutrition or in your morning juice)
In a larger sized skillet add 1 tablespoon grape-seed or olive oil and swirl it coat. Heat on medium high until hot. You can test the heat by adding a few pieces and waiting for them to sizzle. Once hot, slowly add all your tomatoes in as to not splash the oil. Now add your seasoning. I prefer Italian seasoning blend, freshly ground black pepper, and extra oregano with a pinch of hot pepper flakes however you can change these to your specific tastes. Optionally you can add 1 1/2 tablespoons garlic, mined finely. I used a pre-minced version although 5-6 garlic cloves will equal the same amount. Now carefully stir the seasoning. Cover with a lid and cook for 5 minutes, still on medium high, without opening the lid.
After 5-6 minutes remove the lid and stir. At this point your tomatoes should be basically falling apart and super tender. If you have a stick blender you can whizz this up in a pan otherwise transfer to a blender container. Pulse blend for literally 5-10 seconds. Now optionally you can add a thickener like I chose to. I did this so the sauce would “feel” better on the pizza. Add 1-2 tablespoons flax meal to the blender WHILE RUNNING. If you just add this while not running you could just end up with a large ball of thickener. This is also the time to add any salt if desired. If you want you can use psyllium seed or ground chia seeds, however, I would half the amount of thickener as they set foods up faster.
At this point your sauce is ready for use on pasta, a sauce to dip your bread sticks into, or spread onto your pizza crust for amazing homemade pizza!
*Note* the thickener is not required however I find you get a better sauce with it added as most store bought sauces have some form of thickening agent. If you choose not to use it, you will need to cook for 2-3 times as long to get the same consistency OR your sauce is just thinner. It’s your choice, ENJOY! ^.^
Nutritional information is for 1 cup serving. Full recipe makes about 4 1/2 cups:
16 ounces peanuts dry roasted (unsalted is better, if you cannot find unsalted see notes**)
1 teaspoon good quality olive oil or grape-seed oil
1 pinch salt (see note*)
*Optionally* you can add 1 tablespoon sugar for sweetened peanut butter
Equipment:
You will need either a decent quality food processor or a high powered blender. Vitamix or Blendtec blenders are perfect for this! If you use a processor, make sure you scrap the sides down often.
Instructions
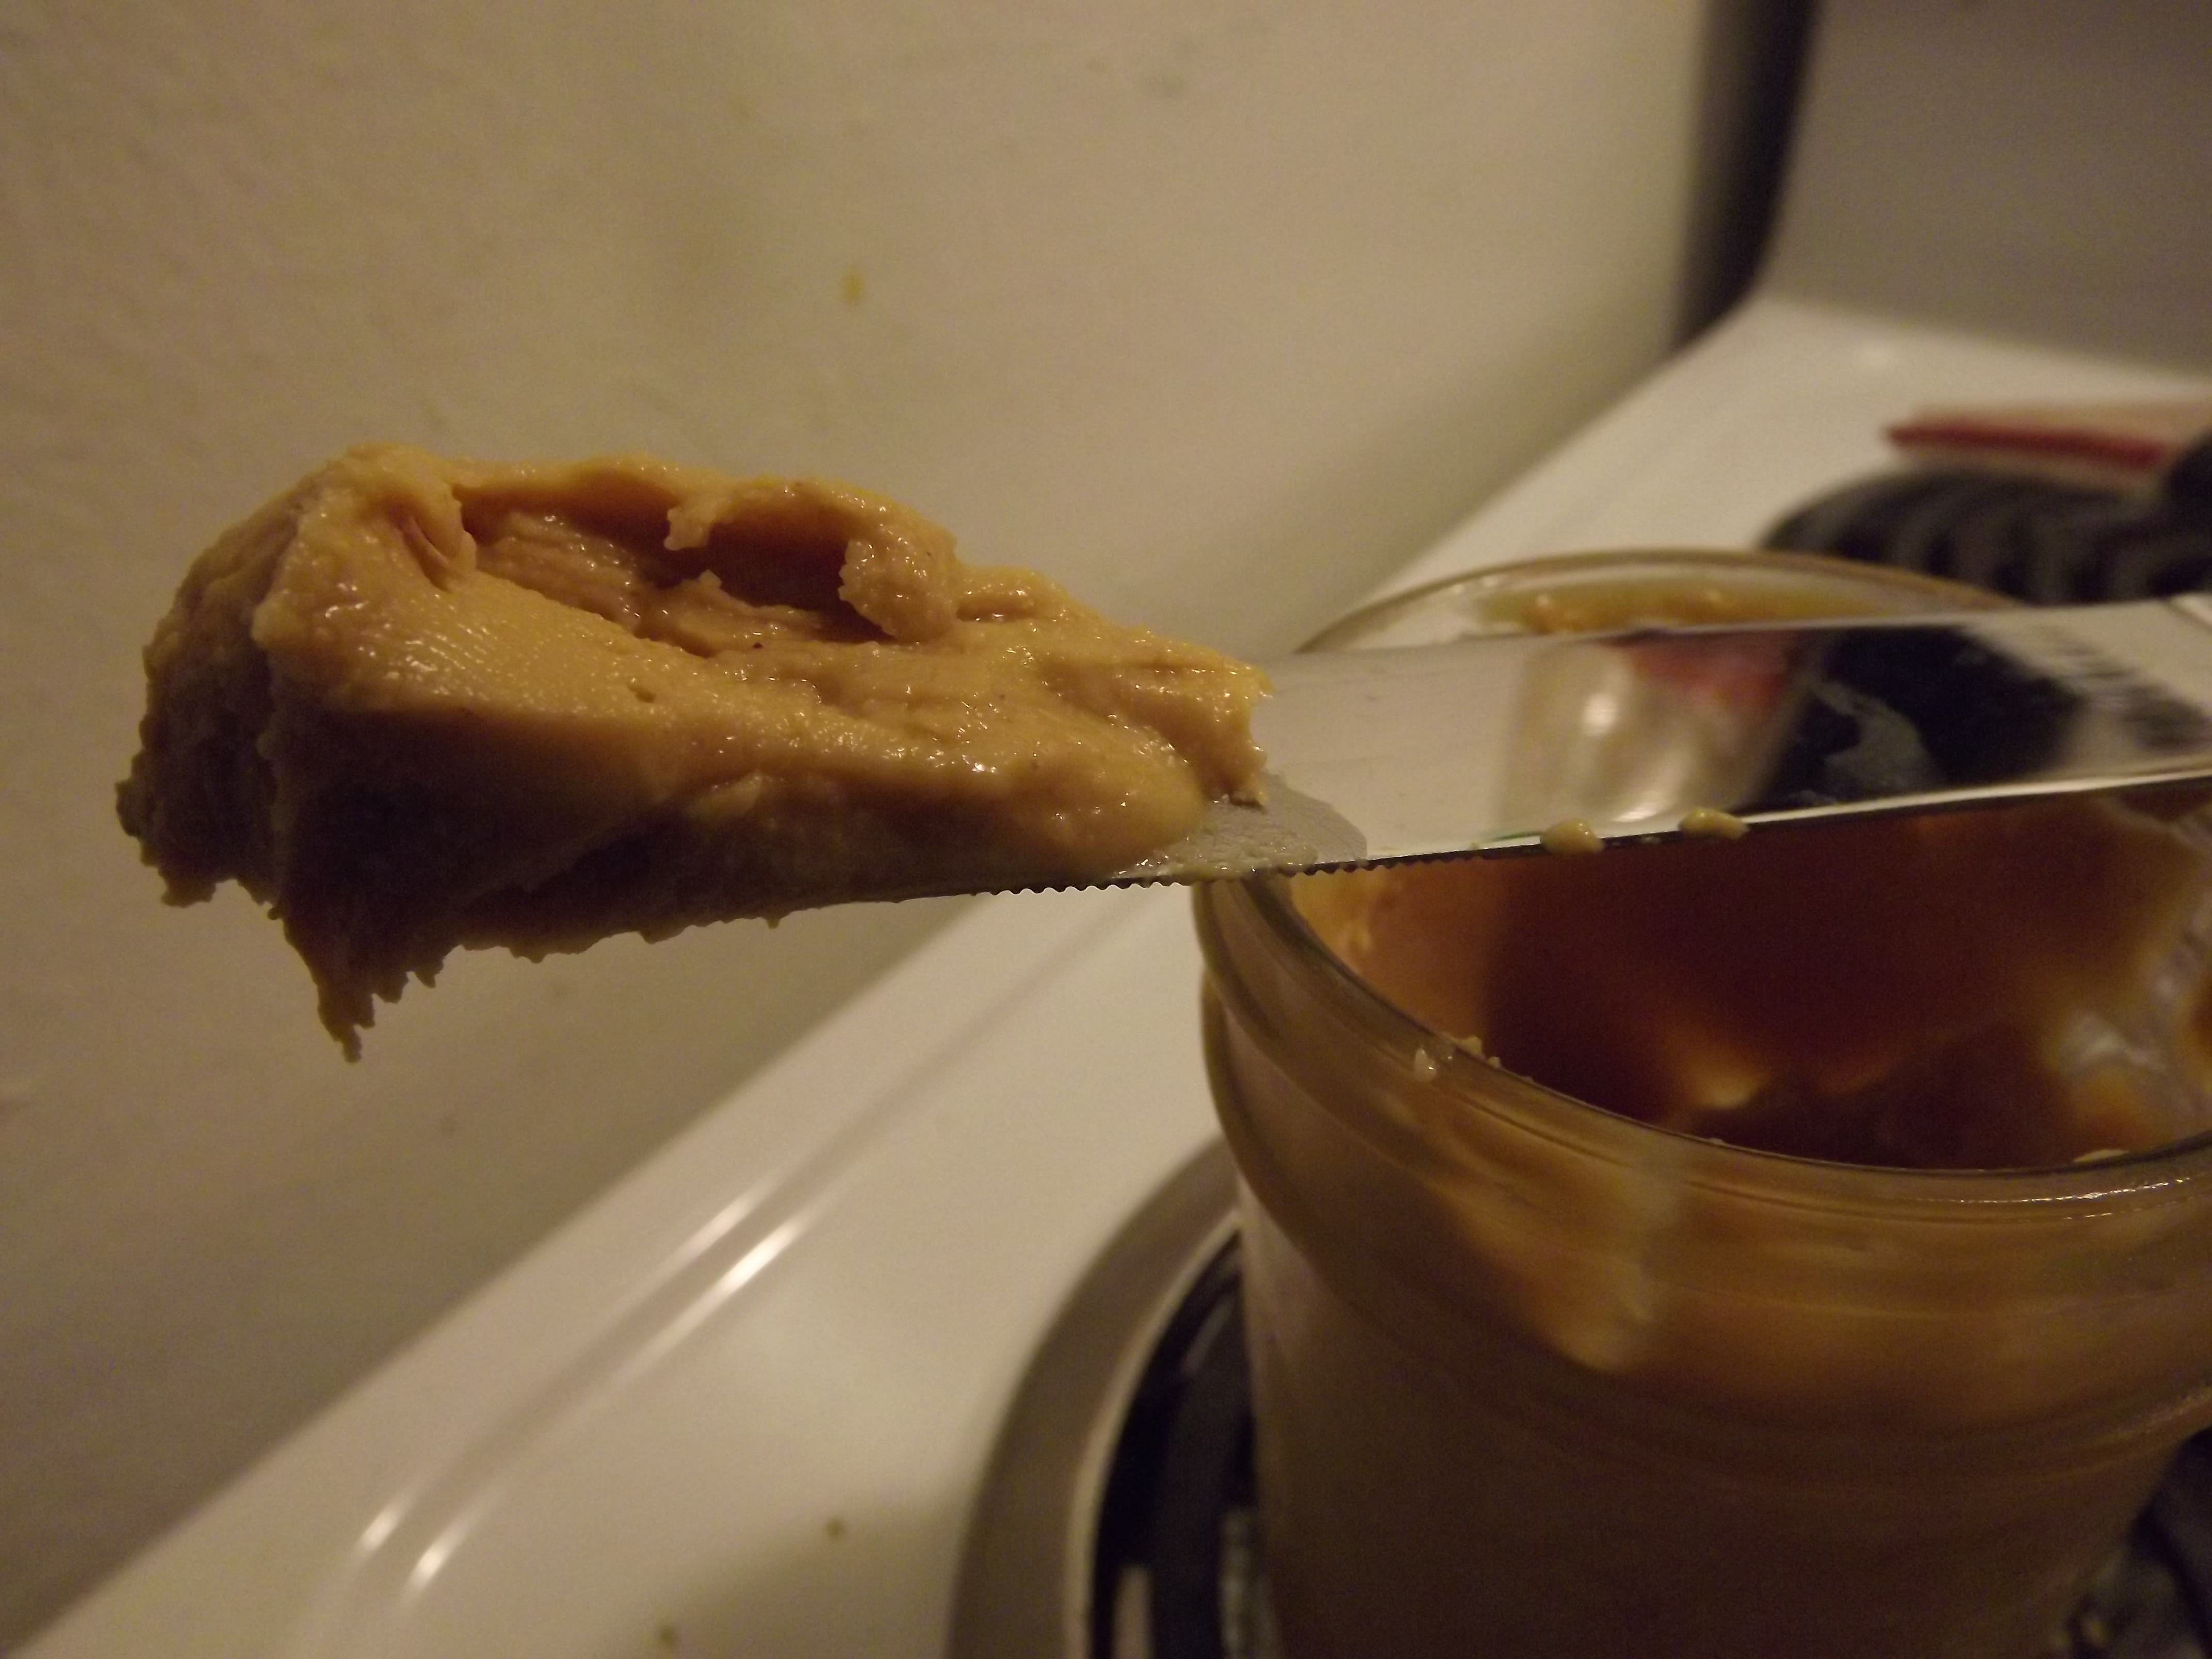
Place 16 ounces of roasted peanut into your blender (or food processor). If using a vitamix, you will need the tamper otherwise you will need a spatula to scrape down the sides. Add a pinch of salt if you're using unsalted peanuts. Process on high while tamping down the peanuts, OR blend on high until you notice the peanuts "climbing" up the sides of the container, then stop the blender (or food processor) and scrape the sides down and repeat. When you're almost to your desired smoothness, add the oil and any optional sweetener. Continue to blend, repeating the scraping process until you reach your desired texture.
Scrape your peanut butter into a container, I suggest glass. Place a tight fitting lid on and you're done! Homemade peanut butter will last 2 or so weeks in the fridge, however this stuff is so good, I doubt you'll make it that long!
Notes
Note: if you're using salted peanuts or do not want any salt in your peanut butter, omit the extra salt!
If you cannot find unsalted dry roasted peanuts, don't worry! You can wash half the peanuts in warm water and let air dry on a tray or cotton cloth overnight at room temperature, or in an oven at 300 for 15-30 minutes. Why should you do this? Because using salted peanuts will make the peanut butter WAY too salty. Not only will it tasted weird, we shouldn't eat all that sodium.
So this video is FAR too long to recap everything said, however if you know your basic way around a kitchen you will not need the step by step instructions. If you do I would suggest watching the video. If you have any questions you can always ask me in a comment or on facebook.
Ingredients: (3 servings)
6 cups cooked quinoa
3 medium-large baked potatoes
15 ounces snap peas or stringless peas
1 pound brocooli
1 1/2 tablespoons minced garlic
1/2 inch piece of minced ginger (about 1 tablespoon)
1/2 tablespoon grapeseed oil
1/2 teaspoon sesame oil
1 1/2 tablespoons sesame seeds
2 bunches or about 5 ounces green spring (welsh) onions
ultra low sodium soy sauce about 1-2 tablespoons
about 3 tablespoons water
chili sauce or ketchup (or anything else) as seasoning
you will also need a heat resistent spatula and a wok
knife
cutting board
Directions:
Prep your brocolli by cutting the tips of the flourets off. Thinly slice the remaining stocks, they’re good food too! If your peas have strings you will need to string them. I buy the stringless versions but I still take the papery white bits off the ends. You will want to thinly slice your green onions. Slice your prebaked potatoes in smaller sized (bite-sized) pieces. Mince your garlic and ginger finely. If using preminced, make sure to wash well under warm/hot water to remove chemicals.
In a wok add your half tablespoon grapeseed oil, spread it around the pan. Turn the heat on high and add a small piece of brocolli into the pan. When it starts to sizzle you know its hot. Also now is a great time to add 1 1/2 tablespoons of sesame seeds, if using. When the seeds start to pop or the brocolli starts to sizzle, add the rest of your brocolli. Stir well to coat with oil. Then add your peas in. Stir fry this for 3 minutes. Then add your water, one tablespoon at a time while stiring. This helps to steam and cook through the vegetables, giving them better texture. At this point you’ll notice just how green they get, very pretty right?
After all the water is in , add your garlic and ginger as-well-as your green onions. Stir well and continue to stir fry for 5 or so minutes. At this point taste your brocolli for texture. If it is soft enough, add your soy sauce and sesame oil. Stir fry 1-2 more minutes and turn off the heat. Stir in gently your potato slices.
To serve this, place your quinoa on a plate and top with the vegetable potato mixture. Put on chili sauce or ketchup or any other desired sauce and enjoy! This ended up making 3 servings. Here is the nutritional information:
Hello everyone! So yesterday I posted a written recipe for a quinoa taco like seasoned dish. It was very good and I suggest you all try it, check that out HERE. After I published it, I got some requests for a video on how to cook quinoa. So I decided to drag out the camera and cook some up. I honestly had no need to make quinoa, but since you asked I delivered! I hope this will be very helpful to you guys.
Materials required:
2 cups of uncooked quinoa (any color works)
3 cups of water
fine mesh strainer OR a large bowl
a large pot with a tight fitting lid, I suggest a dutch oven
a spatula or wooden spoon
patience
Directions:
So to start out with measure out your 2 cups of uncooked quinoa. If you’re new to quinoa or you’re serving it to someone who has maybe never had it. I suggest trying white quinoa (as shown in the video). It has a much milder flavor than the red or black varieties you find in the store. Pick out any discolored bits or pieces that don’t look right. Usually you won’t find any, but better safe than sorry. Transfer your quinoa into a strainer and run under warm water until the water runs clear OR as shown in the video, put the quinoa into a larger sized bowl and fill with warm water. Use your hands to massage the quinoa or rub between your hands slightly vigorously. This helps remove dust and dirt as well as the enzyme inhibitors that are in the quinoa. Repeat these steps until the water runs clear. You are now ready to cook.
Get a large sized pan, since 2 cups of dry quinoa turns into 8 cups of cooked quinoa, you want to make sure you use a large pan. Add 3 cups of water and bring to a rolling boil. When the water is fully boiling, add your quinoa. Use a spatula to scrap out the bowl, no need to waste any of the tiny grains! Stir well to coat every piece with water and remove clumps. Put a lid on and reduce the heat to a simmer. On most stoves this is between the number 2 and 3. If your stove runs hot make sure you use 2 and if your stove tends to run colder use 3. Set a timer for 5 minutes and do not open the lid until that timer goes off.
After 5 minutes, remove the lid (be careful of the steam) and stir well. At this point you shouldn’t have any bits sticking to the bottom, but make sure you scrap along the bottom to be on the safe side. Attempt to push as much of the quinoa back into the water as possible and recover. Set the timer for 10 minutes this time, again do not open the lid. I know its tempting, but I promise your patience is rewarded soon!
After your 10 minutes is up, carefully remove the lid and stir again. Make sure you scrap the bottom in-case there is any sticking. Now inspect your quinoa. Is it nice and fluffy? Is there water left on the bottom? If there is water left, put the lid back on and cook for an addition 5 minutes. (If after 5 minutes you still have water, you will need to strain the quinoa. Don’t worry it’s still edible just use less water next time, this can be a problem if you didn’t thoroughly drain the quinoa after rinsing.) If your pan doesn’t have any remaining standing water, I want you to turn the heat off. Stir well and recover it again. This step is important and give you the perfect texture for quinoa. You can skip this step, but I don’t suggest it. Set a timer for at-least 10 minutes, but 15 is better. Again do NOT open the lid.
After your timer goes off this last time, congratulations, your patience is well rewarded at this stage and your quinoa is completed! YAY! What you will now have is a perfectly fluffy, moist, and completely delicious side dish, main dish, starch, etc. What can you do with this you say? Well you can check out my recipe from yesterday: CLICK HERE. Or you can treat it like any other side dish. Serve it topped with stir-fried vegetables like you would rice. Add some ketchup so satisfy most children. You can add some salt free seasoning, I like Mrs. Dash personally. Really sky is the limit. If you want you can cook it with a pinch of salt or use vegetable broth or any kind of stock to cook it with for more flavor. If you have any additional questions or you have requests for future videos/tutorials. Leave me a comment here or on facebook. Thanks guys!
Here is the nutritional information for 1 cup of cooked quinoa:
So I was watching my Youtube subscriptions today and there was a new video from ShayLoss. For those who have never seen his videos, its a channel of this guy named Shay who used to be really obese and now hes lost a bunch of weight. He gives tips for healthy living and weight loss, etc. He is not a vegan, but he gives good advice. His video today was a recipe, click HERE for the video, but warned though its 23 minutes long. The gist of this video was a recipe for a quinoa salsa/taco filling sorta thing. It was good sounding, but you know me, I had to change it a bit. It tasted SO good I knew I had to share. So please try this. Everything you need for it is in season right now!
Ingredients:
2 cups white quinoa, rinsed VERY well
3 cups water
3 large tomatoes , diced
1 medium bell pepper, diced
1 medium white onion, diced finely
1 bunch cilantro, minced
1 hot pepper (optional), minced and seeded
3 tablespoons garlic, minced finely
1-2 limes, juiced
1 can chickpeas, rinsed VERY well
2 tablespoons grapeseed oil
2 tablespoons sesame oil
2 tablespoons low sodium soy sauce (no more than 20% sodium per tablespoon, less is better)
1 tablespoon cumin powder
Directions:
Start out by rinsing your quinoa very well. The easiest way to do this is use a large bowl and place the quinoa in it. Fill with very warm/hot water and use your hands to kinda squeeze the quinoa. Don’t worry, you won’t hurt it! Drain the water by slightly tipping the bowl, I do this over a fine mesh strainer in-case I spill some. Repeat this until the water is clean and the qunioa does not feel slimy or has lots of bubbles.
Bring your 3 cups of water to a boil in a larger sized pot with a lid. Add in your quinoa when the water is vigorously boiling. Stir well to ensure there are no clumps. Reduce the heat to a simmer (that’s a 2 or 3 on electric stoves). Cover with the lid and let cook for 5 minutes. Stir and recover. Let cook for 10 more minutes. Stir again making sure to scrap the bottom. If all your water has been absorbed, recover and turn off the heat and let set 10 minutes. If it still needs time to cook off the water, give it 5 more minutes. (after a total of 20 minutes, if you still have water left, you’ll need to strain it because you probably added too much, don’t worry its still fine!)
While your quinoa is resting for 10 minutes, prepare all your other ingredients. Keep in mind you want your veggies in smaller sized pieces. Core your tomatoes and dice them. Seed a bell pepper and finely dice. Mince a medium onion or thinly slice. Mince your garlic and wash in warm water to remove bitterness. Finely mince your cilantro, I choose not to use the stems since they are tough, but you can if you want. If you want a little extra flavor, add a FINELY minced chili pepper. I suggest removing the seeds, but if you want super spicy you can leave them in. I used a Fresno pepper, they’re red in color and have a nice spice and flavor. Open a can of chickpeas and rinse them very well, there should be no bubbles left and no slimy texture.
After your quinoa has rested, add all your prepared vegetables. Stir well and break up any clumps of quinoa. Now juice your limes into the mixture. I used a HUGE lime (it was the size of a lemon, no joking!) so I only needed one, however you might need two. Taste as you go and adjust the flavor. Stir well again.
In a small bowl, add your oils, soy sauce, and cumin powder. Whisk this together well and then add it into the quinoa. Stir VERY well. This is your sauce so you want to ensure you get it on all the pieces.
Try it now, if it needs more salt, add more soy sauce or use coarse salt. If it needs more tangyness, add more lime juice. Serve warm with tortillas or chip. OR Serve cold and mix with lettuce or cooked pasta for a new flavor.
I honestly have no clue how much this makes since I didn’t measure it, however I ended up with a large dutch oven full of it! I’m guessing around 10 cups. This is an amazing recipe and I think one that everyone should try, even if you’re not sure about the quinoa. If you cannot find quinoa for some reason I would suggest trying this with couscous if you can eat gluten or buckwheat groats if you cannot. The nutritional information is for quinoa and all the ingredients listed above. Serving size I gave was 100g, however in the picture above that is a small 5 inch plate with 312g on it. While it still does have fat added to it, its far less than the original recipe and honestly it adds to the flavor. I ate this with a little bit of chipotle salsa on-top. Enjoy! (and yes, as you can see this is a kitty approved recipe!)