Quinoa with taco like Seasoning – ShayLoss inspired!
So I was watching my Youtube subscriptions today and there was a new video from ShayLoss. For those who have never seen his videos, its a channel of this guy named Shay who used to be really obese and now hes lost a bunch of weight. He gives tips for healthy living and weight loss, etc. He is not a vegan, but he gives good advice. His video today was a recipe, click HERE for the video, but warned though its 23 minutes long. The gist of this video was a recipe for a quinoa salsa/taco filling sorta thing. It was good sounding, but you know me, I had to change it a bit. It tasted SO good I knew I had to share. So please try this. Everything you need for it is in season right now!
Ingredients:
2 cups white quinoa, rinsed VERY well
3 cups water
3 large tomatoes , diced
1 medium bell pepper, diced
1 medium white onion, diced finely
1 bunch cilantro, minced
1 hot pepper (optional), minced and seeded
3 tablespoons garlic, minced finely
1-2 limes, juiced
1 can chickpeas, rinsed VERY well
2 tablespoons grapeseed oil
2 tablespoons sesame oil
2 tablespoons low sodium soy sauce (no more than 20% sodium per tablespoon, less is better)
1 tablespoon cumin powder
Directions:
Start out by rinsing your quinoa very well. The easiest way to do this is use a large bowl and place the quinoa in it. Fill with very warm/hot water and use your hands to kinda squeeze the quinoa. Don’t worry, you won’t hurt it! Drain the water by slightly tipping the bowl, I do this over a fine mesh strainer in-case I spill some. Repeat this until the water is clean and the qunioa does not feel slimy or has lots of bubbles.
Bring your 3 cups of water to a boil in a larger sized pot with a lid. Add in your quinoa when the water is vigorously boiling. Stir well to ensure there are no clumps. Reduce the heat to a simmer (that’s a 2 or 3 on electric stoves). Cover with the lid and let cook for 5 minutes. Stir and recover. Let cook for 10 more minutes. Stir again making sure to scrap the bottom. If all your water has been absorbed, recover and turn off the heat and let set 10 minutes. If it still needs time to cook off the water, give it 5 more minutes. (after a total of 20 minutes, if you still have water left, you’ll need to strain it because you probably added too much, don’t worry its still fine!)
While your quinoa is resting for 10 minutes, prepare all your other ingredients. Keep in mind you want your veggies in smaller sized pieces. Core your tomatoes and dice them. Seed a bell pepper and finely dice. Mince a medium onion or thinly slice. Mince your garlic and wash in warm water to remove bitterness. Finely mince your cilantro, I choose not to use the stems since they are tough, but you can if you want. If you want a little extra flavor, add a FINELY minced chili pepper. I suggest removing the seeds, but if you want super spicy you can leave them in. I used a Fresno pepper, they’re red in color and have a nice spice and flavor. Open a can of chickpeas and rinse them very well, there should be no bubbles left and no slimy texture.
After your quinoa has rested, add all your prepared vegetables. Stir well and break up any clumps of quinoa. Now juice your limes into the mixture. I used a HUGE lime (it was the size of a lemon, no joking!) so I only needed one, however you might need two. Taste as you go and adjust the flavor. Stir well again.
In a small bowl, add your oils, soy sauce, and cumin powder. Whisk this together well and then add it into the quinoa. Stir VERY well. This is your sauce so you want to ensure you get it on all the pieces.
Try it now, if it needs more salt, add more soy sauce or use coarse salt. If it needs more tangyness, add more lime juice. Serve warm with tortillas or chip. OR Serve cold and mix with lettuce or cooked pasta for a new flavor.
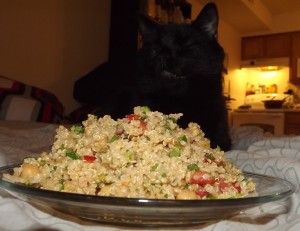
I honestly have no clue how much this makes since I didn’t measure it, however I ended up with a large dutch oven full of it! I’m guessing around 10 cups. This is an amazing recipe and I think one that everyone should try, even if you’re not sure about the quinoa. If you cannot find quinoa for some reason I would suggest trying this with couscous if you can eat gluten or buckwheat groats if you cannot. The nutritional information is for quinoa and all the ingredients listed above. Serving size I gave was 100g, however in the picture above that is a small 5 inch plate with 312g on it. While it still does have fat added to it, its far less than the original recipe and honestly it adds to the flavor. I ate this with a little bit of chipotle salsa on-top. Enjoy! (and yes, as you can see this is a kitty approved recipe!)

