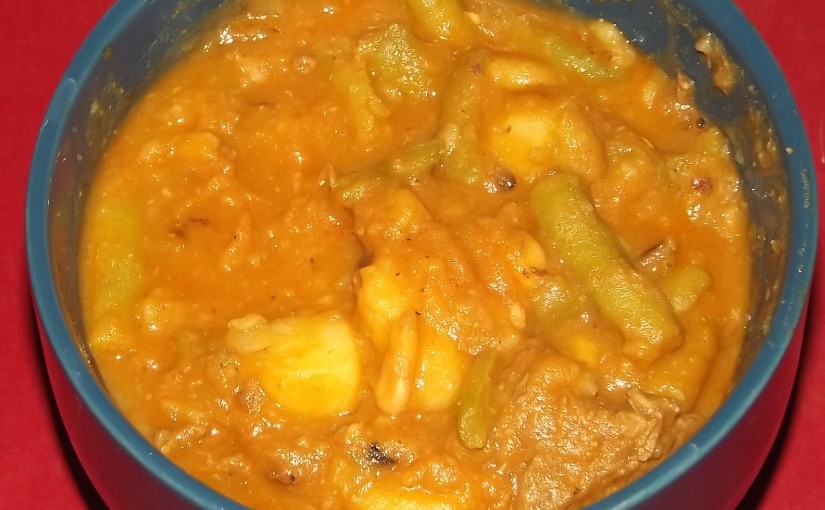
I fell in love with the beef stew at a local place called King Kong. After many attempts, I've come up with this recipe, and I think it's as good or better!
Author: FaylinaMeir
Serves: 8 servings
Ingredients
2½ pounds cut up gold potatoes
1 kg (about 2 pounds) beef chuck, cut into ½ inch pieces trimmed of the fat
1 15 ounce can north beans, rinsed and drained well
1 medium onion, diced
1 6 ounce can tomato paste
approx 3 liters (quarts) water, or more, see recipe
1 tablespoon Ghee (see note)
½ teaspoon salt, as needed, optional
4.00 cup drained, Green Beans, Fresh Cut Rinsed and Drained
2 tablespoons onion powder
2 tablespoons garlic powder
1 teaspoon black pepper, or to taste
Instructions
Prepare all your ingredients ahead of time. Finally dice your onions, cut your potatoes into ½ inch cubes and soak in water til using (this helps prevent oxidization), cut your beef into ½ inch pieces, rinse your beans well, drain your green beans, and mix your tomato paste with all your seasonings. This helps prevent clumps of seasoning in your stew.
With your pot over medium-high, saute your onions til it softens and just starts to brown, this should take about 3-5 minutes. Then add your beef and stir it around. If you want you can brown your beef, but it isn't required. Add enough water to cover your beef by a few centimeters, or about an inch. Add salt now if desired.
Cover, reduce the heat, and boil until the meat is tender. Anywhere between 30-60 minutes. Check on it every so often and add a bit more water if needed so it doesn't boil dry. After meat is tender add your potatoes and enough water to color by a few centimeters or an inch. Boil the potatoes until fork tender, about 15-20 minutes.
At this point add the rest of your ingredients, making sure to dissolve all the tomato paste and seasoning. If you want to, boil your soup down more until it thickens like mine. Adjust the salt and pepper and you're done! This soup only gets better in the fridge the next day and is excellent over toast, cornbread, or plain ole rice. Delicious and a sure fire recipe!
Notes
Any type of onion or any type of potato can be used, I just prefer sweet onions and yukon gold potatoes. If you don't have ghee you can use olive oil or use ½ tablespoon oil and ½ tablespoon butter for the same rich taste
1 teaspoon molasses (optional but makes it more chewy)
1 tablespoon vanilla extract, only the real stuff please
2 tablespoons neutral oil, I used coconut
½ cup unsweetened applesauce
1 unpacked cup raisins***
Instructions
Preheat to 350°F or 175°C.
This step is optional but if you want softer raisins I would advise it. Mix all your liquid ingredients (minus the egg) and let it soak for 20-60 minutes. You can go overnight but they get really soft and I dislike that. I did mine for only 10 minutes and that was good for me.
Next mix all your dry ingredients in your bowl and then add your raisin mixture and egg. Use a spatula to mix (or a spoon) thoroughly. It is a thicker batter so don't be alarmed.
Line your cookie tray with parchment paper or a silicone baking mat. Spoon out a rounded tablespoon per cookie and squish them down. These cookies will rise slightly but will not spread outward. I suggest no more than 12 per tray.
Bake these cookies for 12 minutes and move to a wire rack to cool. They get chewier as they cool.
Notes
Variations: * : You can use all whole wheat flour or all all purpose flour it's a person preference. Whole wheat flour will make the cookies more dense. I would do no more than ½ and ½ but that is me. ** : You can use all sugar or you can skip the sugar and just use maple syrup (or honey). Brown sugar would be best but I used evaporated cane sugar and molasses. *** : You can substitute raisins for any dried fruit to mix this up. Try blueberries and craisins, Delicious!
1 bag cranberries (12-16 ounces)
1 750ml bottle of sweet wine (*See note*)
1/2 cup dark brown sugar
pinch salt
Directions:
In a medium stock pot add your sugar. Turn your burner onto medium high. Wash your cranberries well under warm running water, shake most the water off. Add your cranberries to the pot and stir well to mix with the sugar. After about 60 seconds of stirring, lift your pot off the burner and away from the flame and slowly add some of your wine. Adding only a little at a time will help prevent boil over, when working with alcohol this is important as a boil over could produce flame (never good!). Once you get enough in the pan to coat the bottom of the pan with at-least a 1/4 inch or about a centimeter, you can return the pan to the stove and add the remaining wine. Save that wine bottle though as its a great way to serve your sauce that’ll have your guests wondering!
Bring to a boil while stirring. You want to stir your sauce mixture until all the sugar is dissolved and you no longer feel the sugar at the bottom of the pot.
Once the sauce is boiling, turn the heat down to a simmer or just a little higher. You will want to reduce your sauce down depending on how thick you want your final product. If you want something closer to a jelly or jam, reduce it down by half. If you want something more like a slightly thickened sauce, 1/3 – 1/4 will do just fine. (I reduced by 1/4) Just make a mental note where the sauce started, so you know when you get there. Let it cook uncovered until your desired thickness, make sure to stir every 2-5 minutes just in case, other than that it doesn’t require much effort.
After your sauce is your desired consistency, use an immersion blender or transfer tinto a blender continer. Blend on high until the sauce is a very fine puree, you can optionally strain the sauce if you want.
As this sauce cools down it will thicken up a good bit due to the pectin in the cranberries, so keep this in mind while making it. If kept in a tight fitting glass container this sauce will keep up to 2 – 3 weeks. (photo was taken after sauce was 2 weeks old!)
*NOTE* Make sure you ONLY use a wine you would drink plain. Cooking this wine concentrates the flavor, so if you don’t like the wine to start with, this won’t make it better. I suggest a sweet white wine like a moscato d’asti or a riesling. A sweet red like a rose wine would also go amazingly with this.
CAUTION: If you’re making this for someone who is gluten intolerant or a vegan. Please make sure that the wine you’re using is gluten free and contains no animal products. Most wines are finished with isinglass, this is a concentrated substance from the bladder of fish. Some wines are made with wheat and wheat like products. When it doubt call the producer of this wine or choose a different brand.
Tortillas are one of those things most people never make homemade and that’s a shame, because nothing completes a taco better than a warm freshly made tortilla. This recipe takes the plain wheat tortilla to the next level by adding rye and spelt for extra nutritional benefit as well as great flavor. Combined with sesame oil and extra spices of seasoning, this recipe will win anyone over, vegan or otherwise. Most healthy tortillas (not fully of chemicals or preservatives) are about 40¢ ea which is what I calculated this out to be if divided into 12, so you don’t really save any money, however it’s worth it. Oh and if you’re saying that you can buy a package of tortillas for 2 dollars and you get 10 so that’s 20¢ each, I invite you to read the labels. Chances are the ingredients look like this:
This is the actual ingredients list of a well known brand of “wheat” tortillas. (click here to see the brand and where I’m talking about) I’ll stick to my simple ingredients. With the exception of the Mrs. Dash and the sesame oil, everything in my recipe was organicly purchased so take that into consideration when inspecting the price.
Ingredients:
1/2 – 2 cups warm water
3 cups whole wheat flour, finely ground works best
1 cup spelt flour
1 cup rye flour3 tablespoons oil *see note*
1/4 teaspoon salt **see note**
optional:
3 tablespoons oil *see note*
seasonings (I used chipotle powder and Mrs. Dash)
1 teaspoon yeast (gives great flavor)
Also suggested for this recipe is a cast iron griddle, this gives it lots of extra flavor.
Directions:
In a large sized bowl add your flours, yeast, salt, seasonings, and oil. Stir with a spoon until the oil starts to clump and you mix the flours well. Slowly mix in your hot water, you may need more or less depending on the types of flours you use. I used 2 cups minus 2 tablespoons. The trick is to get a nice dough consistency, without making it too moist. In this case, less water is better. When your dough just starts to come together and it still kind of crumbly, turn the dough out onto a flat surface. You can do the kneading in a bowl, however it makes it more difficult, in my opinion.
With dry hands, knead the dough. Push down the dough with the bottoms of your palms, then raise the dough back up and turn sideways 90 degrees. Repeat this process until your dough is your desired consistency. For chewy and soft pliable dough like what you’d buy in the store, I suggest kneading vigorously for at-least 10 minutes. You will know your dough is ready for rolling when you can press your finger into the dough and it partly holds it shape, but mostly bounces back at you. The dough will also be very smooth and soft looking. For me it took about 16 minutes of average speed kneading. Technically, you don’t have to knead at all, but the consistency won’t be the same and since these are multigrain they might be a bit tough.
Divide your dough into equal sized portions. I decided to make 12 pieces out of this recipe, and they yeilded 8 inch tortillas, you make divide them into smaller or larger pieces to suit your needs. Roll out each ball into the desired size.
Heat your cast iron griddle over medium high heat, until a drop of water will dance on the skillet for 2 seconds before evaporating. Turn down your heat to just below medium, and add your dough. Pay attention not to let the dough fold over the edges, so it cooks evenly. Cooking time is about 30-60 seconds per side, depending on if you use a cast iron skillet or not. Add your rolled dough sheet onto the griddle and do NOT move it until you start to see bubbles appear on-top of the dough. Flip and wait another 30 seconds, then check your dough. If the other side is browned slightly, then it is done. Repeat this until all your tortillas are cooked and Enjoy!
Heres a great tip: Take a skillet with a lid and place a towel or cloth into the bottom. Place your tortillas in this pot once cooked and replace the lid. The towel prevents the steam collecting and turning your tortillas soggy, while keeping the tortillas nice and soft.
To reheat these you can slightly warm in an unoiled skillet or place however many you need on a place, cover with a dampened paper towel and place into the microwave for 30-60 seconds or til heated through. (I do not endorse the use of microwaves, however I know some people use them)
*note: I like using 2 tablespoons sesame oil and 1 tablespoon neutral oil like grape-seed to give extra flavor to the tortillas, however you may use any kind you want, or you may omit it all together. However, oil helps keep the tortillas pliable.
**note: If you are using a seasoning mix that contains salt, do NOT add the additional salt.
Nutritional Information is based off 12 servings (as shown in video) and assumes you used the same ingredients I used. Yours may vary.
This is my go to dressing. This recipe can be vegan friendly if maple syrup or another liquid sweetener like agave is used. It can also be a raw dressing depending on your ingredients. If making this for someone with gluten issues, please insure you use gluten free tamari/soy sauce, AND gluten free vinegar.
Ingredients:
1 cup grape-seed oil or extra virgin olive oil
1/4 cup sesame seed oil*
2 1/2 tablespoons whole sesame seeds
1/4 cup balsamic vinegar
1/4 cup soy sauce
1/2 – 1 teaspoon black pepper, freshly ground is best
2-4 tablespoons honey or liquid sweetener of choice**(see notes)
Ginger***(see notes)
Directions:
In a large bowl (high sided works best), add in your vinegar, soy sauce, and honey or other sweetener. Slowly whisk in 1/2 cup of oil. This should take 1-2 minutes of vigorous whisking. The trick is to make a dressing and not oily vinegar, there is a difference. Once you have 1/2 cup of oil in, try your sauce and if desired add the rest of the oil. At this point if you’re using it, whisk in the sesame oil as well. Once all your oil is whisked in, add your extra flavors or extra sweetener if desired. I used whole sesame seeds and black peppers. Stir in and you are done!
To store this dressing use a mason jar or repurposed glass jar with a tight fitting lid OR use a VERY well cleaned salad dressing bottle, I like the ones with the caps on the lid that restricts the amount that comes out at one time. In the fridge this will last for weeks, maybe a month or so I have never tried it that long. Before using, shake really well to re-emulsify and you’re ready to go.
*If you do not want to use or don’t have access to sesame oil, you can substitute it with regular oil or leave out entirely.
**If you are vegan or simply do not use honey, feel free to use maple syrup or agave. If neither appeal to you, try making a simple syrup by boiling 1/4 cup water with 2 tablespoons sugar. Whisk well to ensure no grainy texture. Once cooled, substitute this in for honey. Start with 1 tablespoon and try it from there as this changes the flavor.
***If you want to add a ginger flare to this dish, use a microplane or fine tooth grater and grate some ginger into the bowl. I would suggest 1/2 – 1 tablespoon. Whisk this in with the sesame seeds. Optionally you can add other flavors such as fresh garlic or chili flakes to change the flavor.
PLEASE TAKE NOTE: If you are making this and/or cooking for someone with gluten allergies or celiacs disease. Make sure to purchase ingredients that are certified gluten free, and clean your utensils very well. Better safe than sorry.
Nutritional information is per tablespoon, Thanks!